Showing posts with label macosx. Show all posts

Tuesday, July 2, 2013

OSX Key: Keyboard Shortcut To Sleep, Log Out, & Shut Down

You might need to press and hold some shortcuts slightly longer than others. This helps you to avoid using them unintentionally.


Press to turn on your Mac or wake it from sleep. Press and hold for 1.5 seconds to put your Mac to sleep.* Continue holding to force your Mac to turn off.

power

Put your Mac to sleep.

option–command–power* or 
option–command–eject 

Put your displays to sleep.

control–shift–power* or 
control–shift–eject 

Display a dialog asking whether you want to restart, sleep, or shut down.

control–power* or 
control–eject 

Force your Mac to restart, without prompting to save any open and unsaved documents.

control–command–power* 

Quit all apps, then restart your Mac. If any open documents have unsaved changes, you will be asked whether you want to save them.

control–command–eject 

Quit all apps, then shut down your Mac. If any open documents have unsaved changes, you will be asked whether you want to save them.

control–option–command–power* or 
control–option–command–eject 

Immediately lock your screen.

control-command-q

Log out of your macOS user account. You will be asked to confirm. To log out immediately without confirming, press Option-Shift-Command-Q.

shift-command-q
option–shift-command-q


* Does not apply to the Touch ID sensor.


OSX Cmd: Reschedule Time Machine Backups


If you want to change the interval of Time Machine backups simply enter the following command into your Terminal:

sudo defaults write/System/Library/LaunchDaemons/com.apple.backupd-auto StartInterval -int 1800

900  = 15 minutes
1800 = 30 minutes
3600 = 1 hour

Tuesday, April 9, 2013

OSX Cmd: Getting Rid of "Open With" duplicates


You right-click icon in the Finder, choose "Open With", and a submenu pops up with an absurd number of duplicate entries.

The duplicate entries in the "Open With" submenu are caused by some corruption of the Launch Services database. The lsregister command, which is buried many layers under the /System/Library folder, will rebuild the database if you invoke it with the right options.

Here’s a on how to fix it (and you can add to your .bashrc):

# Quick way to rebuild the Launch Services database and get rid
# of duplicates in the Open With submenu.
alias fixopenwith='/System/Library/Frameworks/CoreServices.framework/Frameworks/LaunchServices.framework/Support/lsregister -kill -r -domain local -domain system -domain user'

Now you can get rid of the duplicates from the Terminal by running:

fixopenwith

You may need to follow that up with a:

killall Finder


OSX Cmd: Customize Mission Control To Show Only Windows From Current Desktop Space

To get Mission Control to only show you open windows from the current Desktop Space, type or paste the following into your Terminal:

defaults write com.apple.dock wvous-show-windows-in-other-spaces -bool FALSE

Then, restart the Dock process, which also controls the Mission Control process:

killall Dock

Now you’ll only see windows from the currently active Desktop Space when you activate Mission Control.


NOTE: Return it back:

defaults write com.apple.dock wvous-show-windows-in-other-spaces -bool TRUE

killall Dock


Sunday, June 17, 2012

Want Colorful Command Line Shell For Your Mac OS X??


I always wanted to have colorful shell just like RedHat Enterprise Linux on my Mac OS X. It was not easy to configure it until a new command line shell from Ridiculous Fish (@ridiculous_fish) came in.

FISH - Friendly Interactive SHell  
The new fish is a POSIX command line shell with delightful, intuitive features like autosuggestions, 256 color syntax highlighting, web based configuration, and lots more. Best of all, these features just work, out of the box. No arcane syntax, no twiddling obscure knobs.


Steps On Installing & Configuring FISH:
  1. Download fish here.
  2. Just install fishfish.pkg
  3. Open Terminal
  4. Edit /etc/shells as root. Run: sudo vi /etc/shells
  5. Add the line (if missing): /usr/local/bin/fish
  6. To set FISH as as default shell for desire user, Login to desire user shell. Then run: chsh -s /usr/local/bin/fish


Some useful FISH command:

fish_config
Interactively set your color from the web. list FISH functions and variables. Also to see FISH command history.

fish_update_completions
Update man-page completions

Friday, October 29, 2010

OSX Key: Keyboard Shortcut Key For Delete Function

You can use one of the keyboard shortcut key below to perform 4 way of delete action:


delete
Delete one typed character at a time to the left.

fn + delete 
Delete one typed  character at a time to the right. Just like "Del" key on PC.

option + delete
Delete whole typed words at a time to the left

command + delete
Delete all typed charters to the left.


As far as I can tell this works all over Mac OS X and in most apps, including Safari, TextEdit, Terminal, Finder, iTunes, iChat, and more.

Saturday, July 10, 2010

OSX Network: Network Error (tcp_error)

If website not loaded and the following error is displayed usually it's caused by DNS cache.

-------------------------------------------------------------------

Network Error (tcp_error)
A communication error occurred: "Operation timed out"
The Web Server may be down, too busy, or experiencing other problems preventing it from responding to requests. You may wish to try again at a later time.

For assistance, contact your network support team.

-------------------------------------------------------------------

DNS request are usually cache, that’s good as it speeds up the lookups within the same host but sometimes we will want to clear the cache so it don’t hold the values that are no longer valid.

In Leopard (Mac OSX 10.5) or Snow Leopard (10.6) to clear DNS cache , just type this in your Terminal and hit enter:

dscacheutil -flushcache


Note:
A DNS server matches the URL of a website (eg www.domain.com) with its numeric IP address - it translates www.domain.com into the unique numeric IP address (XX.XX.XX.XXX). Whenever you request a web page, your browser asks the name server to find the numeric translation of the URL.

Without the DNS servers, it would be a complicated web because we would have to know all the IP addresses rather than the nice friendly name, like Google.com.

Tuesday, January 13, 2009

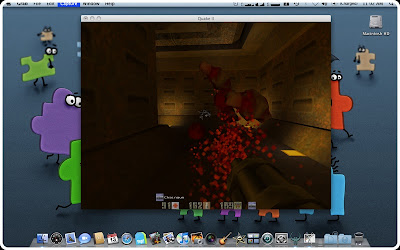
OSX: Quake II On Mac OS X

Old school game is back. One of my old time favorite, Quake II! To be able to run Quake II on Mac OS X you need:
  • Mac OS X v10.0 or higher. Mine Mac OS X 10.5.6
  • Cocoa version of Quake II v1.1 which includes the software and OpenGL renderer plug-ins. You can download it here at fRuitz oF doJo site. 
  • Definitely you need retail version of Quake II. It doesn't matter if you own Classic MacOS or the PC version, both will work. Mine is PC version.
  • Optional... you'll need a graphics board that provides accelerated OpenGL rendering if you want to use the OpenGL renderer instead of software renderer. Mine is Intel GMA X1300 and it's working flawlessly.


Oohhh... Sorry... I didn't mean it...

After you meet all above requirement, just follow below step to install: 
  1. Create directory /Application/Quake II.
  2. Copy baseq2 folder from Quake II CD to directory /Application/Quake II.
  3. Open Quake2v1.1.dmg that you download from fRuitz oF doJo site earlier. Then drag Quake II application file to directory /Application/Quake II. After that go "Into 'baseq2' folder" and drag file GameMac.q2plug to directory /Application/Quake II/baseq2.
  4. Click Quake II application file to play. 
Enjoy gaming.

Thursday, May 15, 2008

OSX: How to create icon?

Have you ever wanted to have your faces as a Home icon? I’m not that freak... ok. But I love to have own icons for certain folders, so icon image will describe the folder contents. A picture is worth a thousand words... huh! If you would like too, below tutorial is for you.

[1] ICON DESIGN
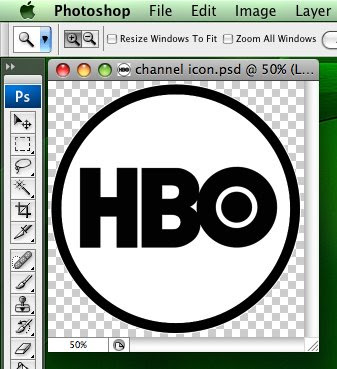
Get the image you like to convert as icon (below is mine). For Leopard the best is to get image at least 512px by 512px or bigger. Make and desire changes (transparent, white background, etc) using any image editor like “Photoshop”. Then resize the image to 512px by 512px and save it as a PSD or PNG.


[2] CONVERT IMAGE TO ICON
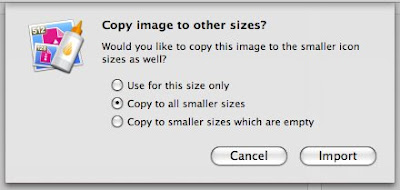
Open application called “Icon Composer” (under /Developer/Application/Utilities). Icon Composer is part of Apple’s Developer Tools. You can find these tools on your Mac OS X install disk. Drag the PSD or PNG image file to the “Icon Composer”. Below box will pop up . Just select “Copy to all smaller sizes”. Then click Import button.


So here the look like after you drag the image onto application. Save the file.


“Icon Composer” save the file as .icns file, which is almost usable. We need to convert .icns file to a .rsrc file, so Mac OS X can recognize it as icon. This can be easily done with free “Icns2Rsrc” application. Open .icns file with “Icns2Rsrc”. It will ask you where to save the .rsrc. Save anywhere you like.


[3] CHANGE THE ICON
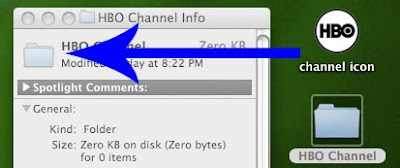
After done save, icon ready to be used. So you can change any folder/file/application icon by right click (or command+click) on folder/file/application icon and select “Get Info”. Then just drop created icon onto most top icon on the info windows (see picture below).


[4] SHOW IT TO THE WHOLE WORLD
DONE!... Screen capture and upload to the internet like me :D

Tuesday, May 13, 2008

OSX Safari: Safari 3 Always Show Tab Bar (Leopard)

Like I’m stated, I just upgrade my Macbook hard disk. I’m installed and updated everything from beginning. While reconfiguring my environment, I realized option "Always show the tab bar" from Safari has gone. In Safari 3's preferences, the option removed, but the inherent functionality is still available. (If you enabled it in Safari 2, it will be enabled by default in Safari 3)

I like the tab bar always there because, just need a double click on the bar and new tab will open. So I don’t need to go through long way for new tab open by clicking “File“ menu and “New Tab“.
  1. Ensure you close the Safari.
  2. Open Property List Editor (/Developer/Applications/Utilities/Property List Editor) Don’t border to search for it if you don’t install developer tools.
  3. Open the Safari plist file (~/Library/Preferences/com.apple.Safari.plist).
  4. Click the triangle to open the Root list, then click once on Root to highlight it.
  5. Click the "New Sibling" button.
  6. Change the name (New item) to "AlwaysShowTabBar", set the Class to Boolean, and set Value to "Yes".
  7. Save changes and quit Property List Editor.
  8. Then open the Safari. TARAAA!

Monday, April 7, 2008

OSX Finder: Sort Folder Before File

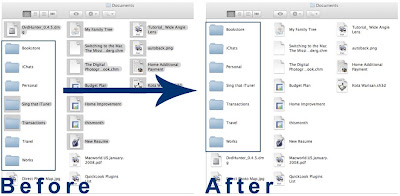
Most of switchers getting used with how windows and linux sorting folder and files. Under Windows Explorer or Gnome Nautilus or KDE Konqurer, folder have a priority and displayed first before files if your order by type (or kind under Mac OS X).

Mac OS X is more logic than other OS; under Finder, filetype .dmg (or any filetype starting before alphabet F) will display first before folder since folder filetype is folder (and starting with alphabet F). LOGIC, BUT MAKE ME SICK!!!


Here the trick to change this behavior under Finder.
  1. Open Terminal.
  2. Open InfoPlist.strings file using vi text editor as a root.
    sudo vi /System/Library/CoreServices/Finder.app/Contents/Resources/English.lproj/InfoPlist.strings

    (change English.lproj to your language)
  3. Find below line:
    /* General kind strings */
    "Folder" = "Folder";
  4. Do following change (by adding space before " Folder" word after equal sign).
    "Folder" = " Folder";
  5. Save the InfoPlist.strings file by press [esc], type wq (mean write and quit vi) then press [return]. 
  6. Close Terminal 
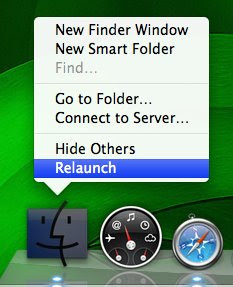
  7. Restart your Finder, right click on Finder icon while pressing the key[option] and select Relaunch your Finder.
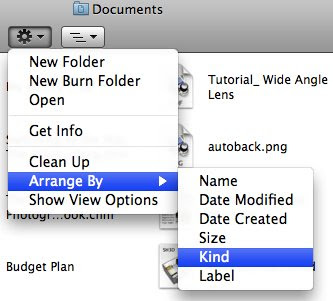
  8. Open Finder and order by Kind. 
TARAAAA!!!.... COOOOLLL!!! HUH!!!


Update: Tested and no problem on Leopard and Snow Leopard.

p/s: If your InfoPlist.strings corrupted after you done the change and you don't copy it first, don't blame me. Blame your BRAIN!!!

Tuesday, February 12, 2008

Apple releases Mac OS X 10.5.2

Apple just released bundle update 10.5.2. It's about 341MB size. Currently downloading, will test it in 11 minutes. It's include all the update from 10.5.1 and bring some new features and updates to Stack, Time Machine, Menu. New bug fixes, for iCal, iChat, Mail, Finder, Printing PDF Preview, Safari and others also included. RAW support for DSLR Canon EOS 1Ds Mark III, Nikon D3, Nikon D300, and Sony Alpha DSLR-A700. iSync, adds support for Samsung D600E and D900i phones.

You can read full review on new features update on 10.5.2 at below sites:


You can get 10.5.2 from software update or download standalone installer here.

If you just finished 10.5.2 update, Apple also just release 'Leopard Graphics Update 1.0' which contains graphics drivers (specifically, an AltivecDVDDriver, IntelGMA drivers, ATI drivers, GeForce and NVDANV drivers, and a new OpenGL framework).

Now rebooting for new 10.5.2. Happy update!!!


p/s: Who's said Mac OS X no need to reboot?

Monday, February 11, 2008

OSX Cmd: Change Your Shell

Mac OS X Leopard root shell default is, /bin/sh. My favourite is /bin/bash. Tried to change from /bin/sh to /bin/bash by editing /etc/passwd but it's not working. When su to root either via terminal or SSH remotely it's still used /etc/sh. Search for usermod command to change shell, as I always doing with others *NIX , but so far I couldn't find either usermod, useradd and userdel command on Mac OS X Leopard at all. Dang!!! Almost a week like a mad cat tried to figure out, at last found chsh command.

The chsh utility allows editing of the user database information associated with user or, by default, the current user. Type in below command to change your shell.

$ sudo chsh root

It will prompt you for password. Just put in your password.

Changing shell for root.
Password for root:

Then it will open up vi with below information. Move to 'Shell:/bin/sh line', and then press I to enter insert mode. Delete sh and replace it with bash. Then press , enter :wq and press to save file and quit. 

# Changing user information for root.
# Use "passwd" to change the password.
##
# Open Directory: /Local/Default
##
Login: root
Uid [#]: 0
Gid [# or name]: 0
Generated uid: FFFFEEEE-DDDD-CCCC-BBBB-AAAA00000000
Home directory: /var/root
Shell: /bin/sh
Full Name: System Administrator
Office Location:
Office Phone:
Home Phone:


Issue below command to check root default shell, it should return you /bin/bash.
 
$ sudo echo $SHELL
Password:
/bin/bash


Saturday, February 2, 2008

OSX Cmd: Copy & Burn DVD/CD

I would like to copy DVD/CD image on Mac OS X. I don't want to install something like Toast since it's also install other craps that I don't need. Disk Utility comes with Mac OS X doesn't create ISO images. It's only can burn it. Tried to find out if there another way to do this on Mac OS X (Leopard in my case) without need installation others application. I found below useful command.

Copy DVD/CD

Typical way to duplicate DVD/CD is to make an ISO image. ISO9600 compliant bit-wise copy of content of an optical disc that allow it to be used on any operating system. You can burn this ISO image to any number of disk and use them anywhere, on any machine.

On Mac OS X, an ISO image can be create using hdiutil command. Below command will automaticaly create .iso file name Photo2008.iso on current directory.

hdiutil makehybrid -o {image_name} {image_source}

eg: hdiutil makehybrid -o Photo2008 /Volume/Photo2008

Note: /Volume/Photo2008 is a DVD


You can also use additional options below.

hdiutil makehybrid -o {image_name} {image_source} [filesystem] -verbose

[filesystem]
Option: -hfs, -iso, -joliet, -udf

-verbose
To see all the operation details.


Burn DVD/CD

Following command to burns the image created to available optical media and verifies the burn.

hdiutil burn {image_source}

eg: hdiutil burn Photo2008.iso


You can also use additional options below.

hdiutil burn {image_source} -speed [x_speed] -testburn -noeject -noverifyburn -verbose

-speed
[x_speed] option: 1, 2, 3 ...., 8, max. This depend how many CPU your DVD/CD drive have. If specified 4, means the drive will be instructed burn at "4x speed". If no -speed specified "max" is the default speed.

-testburn
Don't turn on laser (laser defaults to on).

-noeject
Do not eject disc after burning. The default is to eject the disc.

-noverifyburn
Do not verify disc contents after burn. The default is to verify.

-verbose
To see all the operation details.