"There are heroes... There are superheroes... and then there's Hancock (Will Smith). With great power comes great responsibility-everyone knows that-everyone, that is, but Hancock. Edgy, conflicted, sarcastic, and misunderstood, Hancock's well-intentioned heroic might get the job done and save countless lives, but always seem to leave jaw-dropping damage in their wake. The public has finally had enough- as grateful as they are to have their local hero, the good citizens of Los Angeles are wondering what they ever did to deserve this guy. Hancock isn;t the kind of man who care what other people think - until the day that he save the life of PR executive Ray Embrey (Jason Bateman, and the sardonic superhero begins to reliaze that he may have a vulnerable side after all. Facing that will be Hancock's greatest challenge yet - and task that may prove impossible as Ray's wife, Mary (Charlize Theron), insist that he's a lost cause."
Will Smith's latest superhero-themed flick Hancock. The film will be directed Peter Berg (The Kingdom). Hancock is set for a July 2, 2008, release. Watch trailers below its look fun and will be next Will Smith box-office.
Official Trailer
Extended Trailer
Sunday, May 18, 2008
Thursday, May 15, 2008
OSX: How to create icon?
Have you ever wanted to have your faces as a Home icon? I’m not that freak... ok. But I love to have own icons for certain folders, so icon image will describe the folder contents. A picture is worth a thousand words... huh! If you would like too, below tutorial is for you.
[1] ICON DESIGN
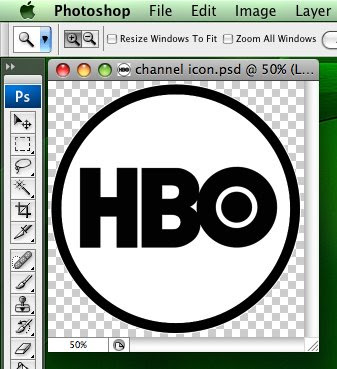
Get the image you like to convert as icon (below is mine). For Leopard the best is to get image at least 512px by 512px or bigger. Make and desire changes (transparent, white background, etc) using any image editor like “Photoshop”. Then resize the image to 512px by 512px and save it as a PSD or PNG.
[2] CONVERT IMAGE TO ICON
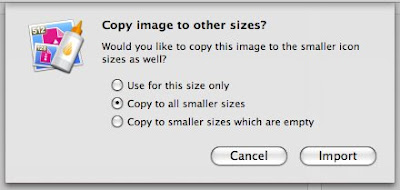
Open application called “Icon Composer” (under /Developer/Application/Utilities). Icon Composer is part of Apple’s Developer Tools. You can find these tools on your Mac OS X install disk. Drag the PSD or PNG image file to the “Icon Composer”. Below box will pop up . Just select “Copy to all smaller sizes”. Then click Import button.
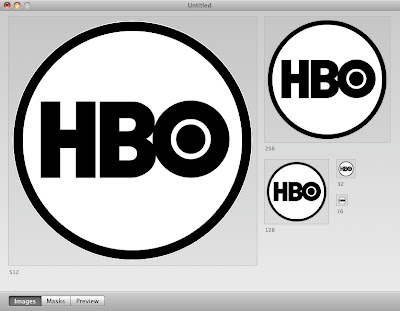
So here the look like after you drag the image onto application. Save the file.
“Icon Composer” save the file as .icns file, which is almost usable. We need to convert .icns file to a .rsrc file, so Mac OS X can recognize it as icon. This can be easily done with free “Icns2Rsrc” application. Open .icns file with “Icns2Rsrc”. It will ask you where to save the .rsrc. Save anywhere you like.
[3] CHANGE THE ICON
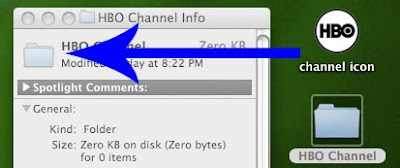
After done save, icon ready to be used. So you can change any folder/file/application icon by right click (or command+click) on folder/file/application icon and select “Get Info”. Then just drop created icon onto most top icon on the info windows (see picture below).
[4] SHOW IT TO THE WHOLE WORLD
DONE!... Screen capture and upload to the internet like me :D

[1] ICON DESIGN
Get the image you like to convert as icon (below is mine). For Leopard the best is to get image at least 512px by 512px or bigger. Make and desire changes (transparent, white background, etc) using any image editor like “Photoshop”. Then resize the image to 512px by 512px and save it as a PSD or PNG.
[2] CONVERT IMAGE TO ICON
Open application called “Icon Composer” (under /Developer/Application/Utilities). Icon Composer is part of Apple’s Developer Tools. You can find these tools on your Mac OS X install disk. Drag the PSD or PNG image file to the “Icon Composer”. Below box will pop up . Just select “Copy to all smaller sizes”. Then click Import button.
So here the look like after you drag the image onto application. Save the file.
“Icon Composer” save the file as .icns file, which is almost usable. We need to convert .icns file to a .rsrc file, so Mac OS X can recognize it as icon. This can be easily done with free “Icns2Rsrc” application. Open .icns file with “Icns2Rsrc”. It will ask you where to save the .rsrc. Save anywhere you like.
[3] CHANGE THE ICON
After done save, icon ready to be used. So you can change any folder/file/application icon by right click (or command+click) on folder/file/application icon and select “Get Info”. Then just drop created icon onto most top icon on the info windows (see picture below).
[4] SHOW IT TO THE WHOLE WORLD
DONE!... Screen capture and upload to the internet like me :D

Tuesday, May 13, 2008
OSX Safari: Safari 3 Always Show Tab Bar (Leopard)
Like I’m stated, I just upgrade my Macbook hard disk. I’m installed and updated everything from beginning. While reconfiguring my environment, I realized option "Always show the tab bar" from Safari has gone. In Safari 3's preferences, the option removed, but the inherent functionality is still available. (If you enabled it in Safari 2, it will be enabled by default in Safari 3)
I like the tab bar always there because, just need a double click on the bar and new tab will open. So I don’t need to go through long way for new tab open by clicking “File“ menu and “New Tab“.
I like the tab bar always there because, just need a double click on the bar and new tab will open. So I don’t need to go through long way for new tab open by clicking “File“ menu and “New Tab“.
- Ensure you close the Safari.
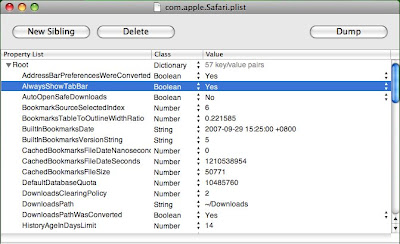
- Open Property List Editor (/Developer/Applications/Utilities/Property List Editor) Don’t border to search for it if you don’t install developer tools.
- Open the Safari plist file (~/Library/Preferences/com.apple.Safari.plist).
- Click the triangle to open the Root list, then click once on Root to highlight it.
- Click the "New Sibling" button.
- Change the name (New item) to "AlwaysShowTabBar", set the Class to Boolean, and set Value to "Yes".
- Save changes and quit Property List Editor.
- Then open the Safari. TARAAA!

Life Always Not Enough! Hohoho!
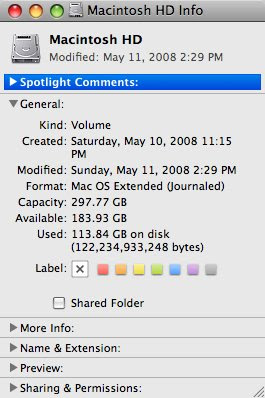
Let get Big Hair Brother jealous. See below photos... Hohoho!!! Before this I’m added 4GB RAM to get me to listen to musics (iTune) while editing photos (Darn! Aperture suck all the RAM). Just now, I’m bump the hard disk to 3200GB (297.77 GB in real, 1GB=1 billion bytes.) because existing 120GB hard disk run out of juice after I bring back 16GB RAW photos from Euro trip.
For who got big appetite, to make your life easier, below listed model that I’m used. Tested and verified by ME! But install on your own risk.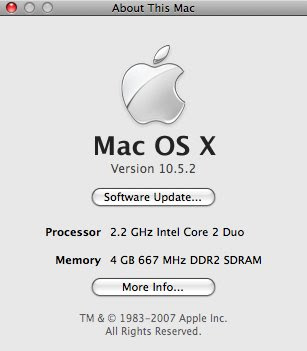
For who got big appetite, to make your life easier, below listed model that I’m used. Tested and verified by ME! But install on your own risk.
- 2 x Kingston KVR667D2N5/2G RAM 2GB, 667mhz, DDR2, CL5
- Western Digital Scorpio 320GB SATA, 1.5Gb/s, 5400RPM, 8MB Cache, 2.5“ HDD


Saturday, May 10, 2008
Tivoli Storage Manager: Virtual Node Restore
Recently one of my colleague asking how to restore backup from client A to client B using TSM Virtual Node. I think I just wrote working guide here so the others can read as well.
SENARIO:
Restore all sys*.dat files under directory /u02/oradata/ on ORAPROD (Client A) to directory /staging/proj04/oradata/ on ORADEVE (Client B). Backup need to be restore from 20/10/2007 until 26/10/2007
Client A = ORAPROD
Client A's Backup Server = TSM_SERVER_US <----- Get from dsm.opt file under ORAPROD
Client B = ORADEVE
Client B's Backup Server = TSM_SERVER_EU <----- Get from dsm.opt file under ORADEVE
Note:
dsm.sys - the file defines all TSM Backup Server client configuration option required.
dsm.opt - this file contain/determine which TSM Backup Server should client contact or backup to.
- Check backup on ORAPROD (client A) either exist or not (this case within certain period):
dsmc q b -fromdate=10/20/07 -todate=10/26/07 -inactive "/u02/oradata/sys*.dat" - Confirmed backup available, get which TSM backup server ORAPROD (client A) backup to and get all the TSM Backup Server client configuration option.
# grep -i servername dsm.opt
SERVERNAME TSM_SERVER_US
# cat dsm.sys
SERVERNAME TSM_SERVER_US
COMMMETHOD TCPIP
TCPPORT 1500
TCPSERVERADDRESS tsm-us.palo-alto.com
PASSWORDACCESS generate
SCHEDMODE prompted
COMPRESSION on
SCHEDLOGRETENTION 14
SCHEDLOGNAME /var/log/tsm/schedule.log
ERRORLOGNAME /local/log/tsm/error.log
TCPBUFFSIZE 512
TXNBYTELIMIT 25600
INCLEXC /opt/tivoli/tsm/client/ba/bin/inclexcl
RESOURCEUTILIZATION 4
TCPNODELAY Yes - Then login to ORADEVE (client B) and add above ORAPROD's TSM Backup Server client configuration option to dsm.sys on ORADEVE (client B).
# cat dsm.sys
SERVERNAME TSM_SERVER_US
COMMMETHOD TCPIP
TCPPORT 1500
TCPSERVERADDRESS tsm-us.palo-alto.com
PASSWORDACCESS generate
SCHEDMODE prompted
COMPRESSION on
SCHEDLOGRETENTION 14
SCHEDLOGNAME /var/log/tsm/schedule.log
ERRORLOGNAME /local/log/tsm/error.log
TCPBUFFSIZE 512
TXNBYTELIMIT 25600
INCLEXC /opt/tivoli/tsm/client/ba/bin/inclexcl
RESOURCEUTILIZATION 4
TCPNODELAY Yes - On ORADEVE (client B), log on Tivoli Client using ORAPROD (client A) credential by issuing below virtual node option:
dsmc -servername=TSM_SERVER_US -virtualnodename=ORAPROD - Restore desire ORAPROD (client A) backup files /u02/oradata/sys*.dat to specific directory /local/IOPLPR1/arch/ on ORADEVE (client B):
restore -fromdate=10/28/2007 -todate=10/29/2007 -inactive "/u02/oradata/sys*.dat" /staging/proj04/oradata/ - TARAAA!!!
Subscribe to:
Posts (Atom)